Nginx 30 分钟快速入门指南:从安装到实战部署
关键词:
Nginx·Web服务器·反向代理·负载均衡·HTTPS·虚拟主机·静态部署
前言
Nginx 是一款高性能的 Web 服务器和反向代理服务器,以其出色的性能、稳定性和丰富的功能模块而闻名。本文将带你在 30 分钟内快速掌握 Nginx 的核心功能,从基础安装到实际项目部署。
安装与验证
macOS 安装
# 使用 Homebrew 安装
$ brew install nginx
验证安装
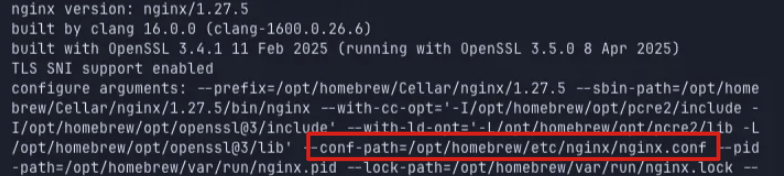
查看 Nginx 版本和配置信息,验证是否安装成功:
$ nginx -V
服务启停管理
进程模型理解
Nginx 采用多进程架构:

- Master 进程(类比老板):负责读取和验证配置文件,管理 Worker 进程
- Worker 进程(类比员工):负责处理实际的客户端请求
Master 进程只有一个,Worker 进程可以有多个,这种设计保证了高性能和稳定性。
查看进程状态
# 查看 Nginx 进程
$ ps -ef | grep nginx

# 查看端口占用情况
$ lsof -i:8080

服务控制命令
# 优雅停止(等待当前请求处理完成)
$ nginx -s quit

# 快速停止(立即终止)
$ nginx -s stop

# 重载配置文件(无需重启服务)
$ nginx -s reload

# 重新打开日志文件
$ nginx -s reopen
静态站点部署
本节将通过部署一个 Hexo 博客来演示 Nginx 静态站点部署的完整流程。
准备 Hexo 项目
1. 安装 Hexo CLI
# 全局安装 Hexo 命令行工具
$ npm install -g hexo-cli
2. 验证安装
# 检查 Hexo 版本
$ hexo -v
如果成功安装,会显示 Hexo 的版本信息。
3. 创建博客项目
# 创建名为 my-blog 的博客项目
$ hexo init my-blog

# 进入项目目录
$ cd my-blog

# 安装项目依赖
$ npm install
4. 生成静态文件
# 生成静态网站文件
$ hexo generate
# 或简写为
$ hexo g
生成的静态文件将位于 public/ 目录下。
部署到 Nginx
将 Hexo 项目的静态文件部署到 Nginx:
# 进入 Hexo 项目的 public 目录
$ cd /path/to/hexo-blog/public

# 将所有文件复制到 Nginx 的 html 目录
$ cp -rf * /opt/homebrew/Cellar/nginx/1.27.5/html
提示: Nginx 的默认 html 目录路径可能因安装方式而异,可通过
nginx -V查看配置路径。
启动 Nginx 服务后,即可通过浏览器访问部署的博客站点。
配置文件详解
Nginx 的配置文件采用层次化结构,主要分为三个层级:
1. 全局块
全局块配置影响整个 Nginx 服务器的运行:
# 全局配置
# user  nobody;                    # 运行用户
worker_processes  auto;            # 工作进程数,auto 表示自动检测 CPU 核数

# 错误日志配置
# error_log  logs/error.log;
# error_log  logs/error.log  notice;
# error_log  logs/error.log  info;

# pid        logs/nginx.pid;       # 进程 ID 文件位置
2. Events 块
Events 块配置服务器与客户端的连接处理:
# events块:服务器和客户端连接配置
events {
    # 指定每个 worker 进程允许的最大连接数
    worker_connections  1024;

    # 使用 epoll 事件模型(Linux 推荐)
    # use epoll;

    # 允许一个 worker 进程同时接受多个连接
    # multi_accept on;
}
3. HTTP 块
HTTP 块是配置的核心部分,包含虚拟主机等配置:
# http块:HTTP 服务器配置
http {
    # 包含 MIME 类型映射文件
    include       mime.types;
    default_type  application/octet-stream;

    # 日志格式定义
    # log_format  main  '$remote_addr - $remote_user [$time_local] "$request" '
    #                   '$status $body_bytes_sent "$http_referer" '
    #                   '"$http_user_agent" "$http_x_forwarded_for"';

    # 访问日志配置
    # access_log  logs/access.log  main;

    # 高效文件传输
    sendfile        on;
    # tcp_nopush     on;

    # 连接超时时间
    # keepalive_timeout  0;
    keepalive_timeout  65;

    # 启用 gzip 压缩
    # gzip  on;

    # 虚拟主机配置
    server {
        listen       8081;              # 监听端口
        server_name  localhost;         # 服务器名称

        # 字符集设置
        # charset koi8-r;

        # 访问日志
        # access_log  logs/host.access.log  main;

        # 根路径配置
        location / {
            # 网站根目录
            root  /yourpath/hexo-blog/public;
            # 默认首页文件
            index  index.html index.htm;
        }

        # 错误页面配置
        # error_page  404              /404.html;

        # 服务器错误页面重定向
        error_page   500 502 503 504  /50x.html;
        location = /50x.html {
            root   html;
        }
    }

    # 包含其他配置文件
    # include servers/*;
}
配置文件最佳实践
- 模块化配置:将不同功能的配置分离到不同文件
- 注释说明:为重要配置项添加注释
- 安全配置:隐藏 Nginx 版本信息,设置合理的超时时间
- 性能优化:根据服务器硬件调整 worker 进程数和连接数
正向代理
正向代理是代理客户端向服务器发送请求,服务器不知道真实的客户端是谁。

应用场景
- 访问控制:企业内网访问外网资源
- 缓存加速:缓存常用资源,提高访问速度
- 匿名访问:隐藏客户端真实 IP 地址
配置示例
server {
    listen 8080;
    server_name localhost;

    location / {
        # 正向代理配置
        proxy_pass $scheme://$http_host$request_uri;
        proxy_set_header Host $http_host;
        proxy_set_header X-Real-IP $remote_addr;
        proxy_set_header X-Forwarded-For $proxy_add_x_forwarded_for;
    }
}
反向代理
反向代理是代理服务器向客户端提供服务,客户端不知道真实的服务器是谁。这是 Nginx 最常用的功能之一。

实战演示
我们将创建三个 Go 服务来演示反向代理功能。
1. 创建后端服务
main-8082.go (端口 8082):
package main

import (
    "fmt"
    "log"
    "net/http"
)

func homePage(w http.ResponseWriter, r *http.Request) {
    fmt.Fprintf(w, "<h1>欢迎访问 Go Web 服务器-1,端口 8082!</h1>")
    fmt.Println("访问记录: 8082 端口被访问")
}

func handleRequests() {
    http.HandleFunc("/", homePage)
    log.Println("服务器启动,监听 8082 端口...")
    log.Fatal(http.ListenAndServe(":8082", nil))
}

func main() {
    handleRequests()
}
类似地创建 main-8083.go 和 main-8084.go,分别监听 8083 和 8084 端口。
2. 启动后端服务
# 分别在三个终端中启动服务
$ go run main-8082.go
$ go run main-8083.go
$ go run main-8084.go
现在可以分别访问:

3. 配置 Nginx 反向代理
# http 块配置
http {
    # 定义后端服务器集群
    upstream backend {
        server 127.0.0.1:8082;
        server 127.0.0.1:8083;
        server 127.0.0.1:8084;
    }

    # 虚拟主机配置
    server {
        listen       8081;
        server_name  localhost;

        # 反向代理配置
        location /app {
            proxy_pass http://backend;
            proxy_set_header Host $host;
            proxy_set_header X-Real-IP $remote_addr;
            proxy_set_header X-Forwarded-For $proxy_add_x_forwarded_for;
        }
    }
}
配置完成后,访问 http://localhost:8081/app 将会被代理到后端的三个服务之一。
负载均衡
负载均衡是将请求分发到多个后端服务器的技术,提高系统的可用性和性能。
负载均衡策略
1. 轮询(Round Robin)- 默认策略
upstream backend {
    server 127.0.0.1:8082;
    server 127.0.0.1:8083;
    server 127.0.0.1:8084;
}
请求按顺序分发到各个服务器:8082 → 8083 → 8084 → 8082...
2. 加权轮询(Weighted Round Robin)
upstream backend {
    server 127.0.0.1:8082 weight=3;  # 权重为3
    server 127.0.0.1:8083 weight=2;  # 权重为2
    server 127.0.0.1:8084 weight=1;  # 权重为1
}
权重越高,分配到的请求越多。适用于服务器性能不同的场景。
3. IP 哈希(IP Hash)
upstream backend {
    ip_hash;  # 启用IP哈希
    server 127.0.0.1:8082;
    server 127.0.0.1:8083;
    server 127.0.0.1:8084;
}
根据客户端 IP 进行哈希,确保同一客户端的请求总是分发到同一台服务器。适用于需要会话保持的场景。
4. 最少连接(Least Connections)
upstream backend {
    least_conn;  # 启用最少连接
    server 127.0.0.1:8082;
    server 127.0.0.1:8083;
    server 127.0.0.1:8084;
}
将请求分发到当前连接数最少的服务器。
健康检查配置
upstream backend {
    server 127.0.0.1:8082 max_fails=3 fail_timeout=30s;
    server 127.0.0.1:8083 max_fails=3 fail_timeout=30s;
    server 127.0.0.1:8084 max_fails=3 fail_timeout=30s backup;  # 备用服务器
}
max_fails=3:最大失败次数为 3 次fail_timeout=30s:失败超时时间为 30 秒backup:标记为备用服务器,只有在其他服务器都不可用时才使用
实战测试
启动三个 Go 服务后,配置 Nginx 负载均衡:
http {
    upstream backend {
        server 127.0.0.1:8082 weight=3;
        server 127.0.0.1:8083 weight=2;
        server 127.0.0.1:8084 weight=1;
    }

    server {
        listen 8081;
        server_name localhost;

        location /app {
            proxy_pass http://backend;
            proxy_set_header Host $host;
            proxy_set_header X-Real-IP $remote_addr;
            proxy_set_header X-Forwarded-For $proxy_add_x_forwarded_for;
        }
    }
}
多次访问 http://localhost:8081/app,观察请求分发情况。
HTTPS 配置
HTTPS 是 HTTP 的安全版本,通过 SSL/TLS 加密传输数据。配置 HTTPS 需要 SSL 证书。
1. 生成自签名证书(开发环境)
# 创建证书目录
$ sudo mkdir -p /etc/nginx/ssl

# 生成私钥
$ sudo openssl genrsa -out /etc/nginx/ssl/nginx.key 2048

# 生成证书签名请求
$ sudo openssl req -new -key /etc/nginx/ssl/nginx.key -out /etc/nginx/ssl/nginx.csr

# 生成自签名证书
$ sudo openssl x509 -req -days 365 -in /etc/nginx/ssl/nginx.csr -signkey /etc/nginx/ssl/nginx.key -out /etc/nginx/ssl/nginx.crt
2. Nginx HTTPS 配置
server {
    listen 443 ssl http2;
    server_name localhost;

    # SSL 证书配置
    ssl_certificate /etc/nginx/ssl/nginx.crt;
    ssl_certificate_key /etc/nginx/ssl/nginx.key;

    # SSL 安全配置
    ssl_protocols TLSv1.2 TLSv1.3;
    ssl_ciphers ECDHE-RSA-AES128-GCM-SHA256:ECDHE-RSA-AES256-GCM-SHA384;
    ssl_prefer_server_ciphers off;
    ssl_session_cache shared:SSL:10m;
    ssl_session_timeout 10m;

    # 网站根目录
    root /usr/share/nginx/html;
    index index.html index.htm;

    location / {
        try_files $uri $uri/ =404;
    }
}

# HTTP 重定向到 HTTPS
server {
    listen 80;
    server_name localhost;
    return 301 https://$server_name$request_uri;
}
3. 生产环境证书配置
对于生产环境,推荐使用 Let's Encrypt 免费证书:
# 安装 Certbot
$ sudo apt-get install certbot python3-certbot-nginx

# 获取证书
$ sudo certbot --nginx -d yourdomain.com

# 自动续期
$ sudo crontab -e
# 添加以下行
0 12 * * * /usr/bin/certbot renew --quiet
4. 安全最佳实践
server {
    listen 443 ssl http2;
    server_name yourdomain.com;

    # SSL 配置
    ssl_certificate /path/to/certificate.crt;
    ssl_certificate_key /path/to/private.key;

    # 安全头部
    add_header Strict-Transport-Security "max-age=31536000; includeSubDomains" always;
    add_header X-Frame-Options DENY always;
    add_header X-Content-Type-Options nosniff always;
    add_header X-XSS-Protection "1; mode=block" always;
    add_header Referrer-Policy "strict-origin-when-cross-origin" always;

    # 隐藏 Nginx 版本
    server_tokens off;

    location / {
        root /var/www/html;
        index index.html;
    }
}
5. 测试 HTTPS 配置
# 检查配置语法
$ sudo nginx -t

# 重新加载配置
$ sudo nginx -s reload

# 测试 HTTPS 连接
$ curl -k https://localhost
$ openssl s_client -connect localhost:443
虚拟主机
很多时候,一个站点在起步阶段并没有非常大的访问量。所以把多个小流量的网站部署到一台服务器上,也不会给服务器造成太大压力。这样也可以节省服务器的资源和成本。
下面让我们使用 Nginx 的虚拟主机(http 块中 server 块来配置),实现在一台服务器上部署多个站点。
快速搭建一个 Vue 项目
# 创建项目
$ npm create vite@latest

# 安装依赖
$ npm install

# 本地运行
$ npm run dev

# 本地打包
$ npm run build
部署 Vue 项目(之前已经在服务器上部署了一个 hexo-blog 的站点)来实现 Nginx 的虚拟机多站点部署。
server {
  listen 5173;
  server_name localhost;
  location / {
      root  /yourpath/vite-project-with-nginx/dist;
      index  index.html index.htm;
  }
}
重载 Nginx 配置之后,就可以在 localhost:5713 访问这个 Vue 应用站点了。
最佳实践
1. 配置文件组织
# 主配置文件 /etc/nginx/nginx.conf
http {
    include /etc/nginx/conf.d/*.conf;
    include /etc/nginx/sites-enabled/*;
}
# 推荐的目录结构
/etc/nginx/
├── nginx.conf          # 主配置文件
├── conf.d/            # 通用配置
│   ├── gzip.conf
│   ├── security.conf
│   └── ssl.conf
├── sites-available/   # 可用站点配置
│   ├── example.com
│   └── api.example.com
└── sites-enabled/     # 启用站点配置(软链接)
    ├── example.com -> ../sites-available/example.com
    └── api.example.com -> ../sites-available/api.example.com
2. 性能优化
Gzip 压缩配置
# /etc/nginx/conf.d/gzip.conf
gzip on;
gzip_vary on;
gzip_min_length 1024;
gzip_comp_level 6;
gzip_types
    text/plain
    text/css
    text/xml
    text/javascript
    application/json
    application/javascript
    application/xml+rss
    application/atom+xml
    image/svg+xml;
缓存配置
# 静态资源缓存
location ~* \.(jpg|jpeg|png|gif|ico|css|js)$ {
    expires 1y;
    add_header Cache-Control "public, immutable";
}

# HTML 文件缓存
location ~* \.html$ {
    expires 1h;
    add_header Cache-Control "public";
}
连接优化
# 工作进程优化
worker_processes auto;
worker_connections 1024;

# 连接保持
keepalive_timeout 65;
keepalive_requests 100;

# 缓冲区优化
client_body_buffer_size 128k;
client_max_body_size 10m;
3. 安全配置
# /etc/nginx/conf.d/security.conf
# 隐藏版本信息
server_tokens off;

# 安全头部
add_header X-Frame-Options "SAMEORIGIN" always;
add_header X-Content-Type-Options "nosniff" always;
add_header X-XSS-Protection "1; mode=block" always;
add_header Referrer-Policy "strict-origin-when-cross-origin" always;

# 限制请求大小
client_max_body_size 10M;

# 防止访问隐藏文件
location ~ /\. {
    deny all;
    access_log off;
    log_not_found off;
}
4. 监控和日志
# 自定义日志格式
log_format main '$remote_addr - $remote_user [$time_local] "$request" '
                '$status $body_bytes_sent "$http_referer" '
                '"$http_user_agent" "$http_x_forwarded_for" '
                '$request_time $upstream_response_time';

# 访问日志
access_log /var/log/nginx/access.log main;
error_log /var/log/nginx/error.log warn;

# 状态监控
location /nginx_status {
    stub_status on;
    access_log off;
    allow 127.0.0.1;
    deny all;
}
5. 常用命令总结
# 配置测试
nginx -t

# 重新加载配置
nginx -s reload

# 查看配置信息
nginx -V

# 查看进程状态
ps -ef | grep nginx

# 查看端口占用
lsof -i:80

# 查看访问日志
tail -f /var/log/nginx/access.log

# 查看错误日志
tail -f /var/log/nginx/error.log
6. 故障排查
常见问题及解决方案
-
403 Forbidden
- 检查文件权限:
chmod 755 /path/to/files - 检查 SELinux:
setsebool -P httpd_can_network_connect 1
- 检查文件权限:
-
502 Bad Gateway
- 检查后端服务是否运行
- 检查防火墙设置
- 查看错误日志定位问题
-
504 Gateway Timeout
- 增加超时时间:
proxy_read_timeout 300; - 检查后端服务响应时间
- 增加超时时间:
-
配置不生效
- 确认配置语法正确:
nginx -t - 重新加载配置:
nginx -s reload - 检查配置文件路径
- 确认配置语法正确:
7. 部署检查清单
- 配置文件语法检查通过
- SSL 证书配置正确
- 安全头部已添加
- Gzip 压缩已启用
- 缓存策略已配置
- 日志格式已自定义
- 监控端点已配置
- 备份配置文件
- 性能测试通过
- 安全扫描通过
总结
通过本文的学习,你已经掌握了 Nginx 的核心功能:
- 基础操作:安装、启动、停止、重载配置
- 静态部署:部署 Hexo 博客等静态网站
- 代理功能:正向代理和反向代理的配置
- 负载均衡:多种负载均衡策略的应用
- HTTPS 配置:SSL 证书的配置和安全优化
- 虚拟主机:一台服务器部署多个站点
- 最佳实践:性能优化、安全配置、监控日志
Nginx 作为现代 Web 架构的重要组件,掌握其核心功能对于 Web 开发和运维工作至关重要。建议在实际项目中多加练习,根据具体需求调整配置参数。
下一步学习建议:
- 深入学习 Nginx 模块开发
- 了解 Nginx Plus 商业版功能
- 学习容器化部署(Docker + Nginx)
- 掌握自动化配置管理(Ansible + Nginx)
参考资源
官方文档
- Nginx 官方文档 - 最权威的 Nginx 文档
- Nginx 配置指令参考 - 所有配置指令的详细说明
- Nginx 模块参考 - 核心模块文档
学习资源
- Nginx 初学者指南 - 官方入门教程
- Nginx 配置最佳实践 - 配置陷阱和最佳实践
- Mozilla SSL 配置生成器 - SSL 配置生成工具
工具和资源
- Nginx 配置测试工具 - 在线配置验证
- SSL Labs SSL 测试 - SSL 配置安全性测试
- GTmetrix - 网站性能测试工具
社区资源
- Nginx 官方博客 - 最新技术文章和案例
- DigitalOcean Nginx 教程 - 实用教程集合
- GitHub Awesome Nginx - Nginx 相关资源汇总
书籍推荐
- 《Nginx HTTP Server》- 深入理解 Nginx 配置和优化
- 《Mastering Nginx》- Nginx 高级应用和性能调优
- 《High Performance Web Sites》- Web 性能优化经典书籍
本文档持续更新,如有问题或建议,欢迎提交 Issue 或 Pull Request。